
A water soluble marker
McCall's M7003 (for pants)
Simplicity 1609 (for tunic)
Butterick 6097 (for sleeves)Spoonflower's Princess of the clouds print 3 yards crepe de chine
Chiffon or sheer fabric to match your tunic fabric (the crepe) 3 yards
half a yard of matching crepe de chine in white for yoke
Foam or thick interfacing for belt (1 Yard)
Gold/copper braided trim (at least 5 yards I believe)Two large belt snaps
Red button
Red button
Cotton batting for yokeNeedles with wide eyes
Matching red ballet flats (I found these at Kohls that matched in wine)Medium size embroidery hoop
Embroidery floss in the following colors (start with ten skeins):
Yellow: 745
Buttercream: 746
Rust red: 221
Dark burgundy: 814
Dark brown: 938
Dusty rose: 223
Yellow: 745
Buttercream: 746
Rust red: 221
Dark burgundy: 814
Dark brown: 938
Dusty rose: 223
Notes before starting:
I created this costume on a very tight budget. It can be done for under $200 if you are savvy! I cut costs in the following ways: Used patterns I had on hand and Frankensteined them, found a sheer curtain at a thrift store for my cape lining, bought my fabric and foam on sale at Joann's on Black Friday, got my extra crepe at a scrap store, bought all my embroidery floss at Walmart (they had the cheapest), hand braided my trim from a single corded trim at Hobby Lobby, and bought my shoes on sale.
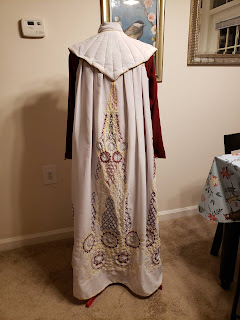
My first step was ordering my Spoonflower fabric. I went with the regular version and not the embroidery version, even though I planned on embroidering it, because I felt I could not do the shadow stitch required. Could I do it all over again, I would have ordered the embroidery version available and either tried harder at the shadow stitch or painted the flower petals ahead of time to look correct. I ordered the short version of the fabric because I am 5'2". Now for Rebel Legion, you do NOT have to embroider this to get approved, but if you are going to do it, I highly recommend embroidering it if you can. It makes the drape SO nice and really makes this costume pop.
I got all my embroidery floss in the listed colors above and a medium size embroidery hoop. I used this incredible chart to go by from Antoa on the forums. Her build was very helpful!

Now the screen worn version used a stem stitch for the yellow and most of the other places used either a back stitch or a shadow stitch. I stem stitched my whole cape.
You can see here some great shots of the stitching found in the Star Wars Costumes book. By the way, that book has a TON of info on the original costumes and how they were constructed. Her original cape was hand embroidered, too!

This part took me seven months total to do. I spent all my free time at night or when the kids were at school on this (I did take two months off in the middle cause it was driving me crazy, so believe me it's okay if it takes you a long time!) I would say that it took me a little over two weeks per motif when I was working steadily on it.

For the lining, I found a sheer curtain from a thrift store, and took the end of it apart so that it would be long enough. The nice part about this was the bottom was finished already, so that saved me from having to hem it.
After trimming the cape correctly I sewed the lining to the cape right sides together. The original cape cut off part of the top white flowers, so that the whole cape falls at an angle. I killed me to cut off the flowers I had sewn, but it had to be done.
For the trim which goes on the edges of the cape and tunic, I picked up five rolls of single gold/copper trim cord of 5 yards each and hand braided it. Now this was NOT enough. I would say you need 10. I ended up having to go back and get an alternative for the back of the tunic and bottom of the cape. I hand sewed all the trim to the costume with a very tiny whip stitch using a matching gold thread, working from the inside of the garments.


To make the yoke, I used Alce-Rey's pattern available on the Bun Squad group on Facebook. Now, if you are in the US, the paper size she used is not the same. However, you can still print it out and piece it together, though you will have to approximate some of the clipped off spots. I traced on to my fabric and used a straight edge to mark my quilting lines. At this point, I had already made my tunic, pants and belt, so I used the left over red crepe to line the yoke. I used a red thread for my quilting lines. Then I once again added the braided trim by hand.

Next, I placed my cape on to the yoke and placed the pleats in place and pinned them down.


Then I carefully removed the pins off the yoke and put them back in place to keep the pleats where the needed to be and basted them in place. Next I cut my arm hole. This killed me again, cause I had to cut into the spires in the middle of the under arms I had SO carefully made! The I reattached the cape with pins and hand sewed the lining in with a backstitch.


The tunic was very simple to make. I wanted to save some money, so I raided my patterns stash for stuff. I keep a lot of base patterns I can use for multiple projects on hand, and this has been very helpful over the years. Now there are a lot of other great patterns out there others have used and if you don't have patterns on hand that you can use, I would definitely use those suggestions! I saw a few girls use PJ pants as their base for their pants and then added a cuff to the ends and I think that is a fabulous way to do it! My base patterns were a dress, which I did not sew the side up to completely, and sleeves from a blouse, which I added the point to, and took in where needed. Then I added the copper trim to by hand. I also chose to do a keyhole back, which I was very happy with! I used some of the matching embroidery floss for the loop and a matching red button I had on hand


My original belt you can see in the picture above was far too wide. It should be about 5 inches wide at rhombus/diamond. Mine was twice that! Anyways on to construction for that! I measured out my diamond shape on paper first. When I was happy with the dimensions, I measured for the band, which was about 2 inches wide. Then I laid this out on my foam interfacing and cut that out. Next I laid this out on my belt fabric, traced with a sharpie, then left about a half an inch all the way around when I cut. Then I sewed on my tracing marks, to ensure my fabric would be tight around the belt. Don't forget to clip your edges! I fed the foam into the belt after turning it right side out and sealed the ends with the machine. Last, I added the snaps in the back!
All that was left was the shoes, which I found to match at Kohls, but I know other gals hand dye theirs to match which also works!


This was one of my most time consuming builds yet because of all the handwork, but so worth it!


This comment has been removed by the author.
ReplyDelete